Showing posts with label Indie Games. Show all posts

Thursday, October 25, 2012

7 day project postmortem

I promised to write up a summary about my 7 day game project last month, and managed to procrastinate on it for this long.  However I'm planning to do another 7 day game project here very soon, so I figured I should probably tie up the loose ends on the last one before moving forward.

For anyone here for the first time, in September (2012) I challenged myself to create a game in 7 days.  I blogged about each day of the process, and in the end I had a game I eventually released for Android on the Google Play Store as Match'n Flip.  A big reason I decided to do this 7 day game challenge was to help kick start my creative juices and get back into the rapid game prototyping mindset.  As a postmortem for that experience, I'll share a few pearls of wisdom for anyone considering doing a similar mental exercise.

What Went Right

  1. Keeping eyes on the prize - 7 days isn't a whole lot of time to get a game kicked out; so it's very important to stay focused on what's important to the game play.  I'm frequently guilty of adding complexity to a game to try to add fun, and while this can sometimes work, many times extra complexity isn't needed.  One of my goals for this project was to create a game around a simple game mechanic, and let the game mechanic stand on its own.  This mindset worked very well for me and help me focus on the core game mechanic and resist the temptation to add unnecessary extra features.
  2. Rapid prototyping and iteration - One of my goals for the project was making better use of my time during development and implementing functionality with more friendly tweaking ability.  Unity3D is super convenient because any publicly declared variables will automatically show up in the editor and are available to tweak/change at run time   In the past I haven't used this as much as I should have, preferring instead to hard code variable values and changing them in code on the fly.  While it's debatable as a more 'programmer friendly' approach, it artificially adds extra time for testing small value tweaks for no real reason because you need to wait for the editor to recompile the scripts.  It seems stupid now, but fighting one of the best features of the engine you're using is not a good idea; and embracing it will help you get things done much faster.
  3. Sought input from friends - I made it a point to get as much input as possible from friends and family as the game progressed.  This let me get fairly unbiased impressions of the game and specific features before I'd invested too much time in them; and then make appropriate course corrections and changes.  In one of the best examples of this, I told a friend about an idea I had for some game rules I wanted to try out.  After explaining them he looked at me and said, 'Jay that's confusing as hell, no one will understand that in 15 seconds'.  Talking to friends, asking their opinion about the game you have so far, or ideas you want to try, is super helpful.

What Went Wrong

  1. Started 7 day challenge at a bad time - I started the 7 day challenge almost as soon as I thought of the idea because I was excited to get momentum for myself to start working.  Unfortunately I didn't think to look at my schedule ahead of time; so the last 2 days happened when I was on vacation to visit my family.  Because of this and the next point I'll talk about, my 7 day challenge ended up spanning almost 2 weeks.
  2. Got sick for the last 2 days (while on vacation) - While I was visiting my family I also got sick, which meant any time I could have eke'ed out to work was lost because I was in bed sleeping.  It's amazing how much energy it can take to be creative; while I lay in bed resting I would try to think of game ideas for the challenge.  However usually I was too exhausted to think of anything and would usually fall right asleep thereafter.  Just bad luck there.
  3. Had to learn a new GUI system - For this project I decided to switch to a new GUI system (NGUI) for Unity3D (the game engine I primarily use for my games).  While I'm glad I switched to NGUI there was definitely a learning curve to overcome, which ended up chipping away at the time I could have used to work on the game.  Next time I'll get ramped up on any new tools beforehand, so there will be less impact on the actual game dev time.

Summary:

Overall this was a very fun and exciting experience for me.  After completion our previous project, Access Point, I was feeling very burnt out and mentally exhausted.  Giving myself a 7 day challenge was a breath of fresh air, and a great way to get myself back into the mindset of making new games.

Thanks for reading!  I plan to do another 7 day game challenge for myself in the next week or so.  Once again I'll be writing out it everyday, so check back soon!

Wednesday, October 10, 2012

Trick for visualizing arrays of serializable classes in the Unity3d inspector

In the Unity3D editor,the inspector will automatically show the names and values of any variables you declare within a MonoBehaviour -derived component. This is incredibly useful for debugging the values of properties while testing, and also provides a very easy avenue to tweaking the values of exposed variables.

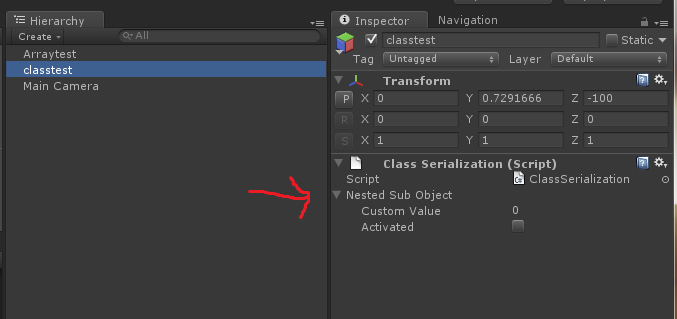
However what do you do if you want to nest a class of related properties in a MonoBehaviour -derived component?  By default the names and values of the variables within the nested object will appear in the inspector.  This is where the System.Serializable attribute is necessary, applying the System.Serializable attribute to the class will tell the Unity inspector to display the names and values of the variables in the inspector.  This makes the System.Serializable attribute a very handy tool!


One common using for serializable nested subclasses is in lists/arrays to hold configuration data for any number of things, such as inventory descriptions and properties, level lists, difficulty modifiers, etc.  Unfortunately when you put a serializable class in a List or Array, the way each instance element is named leaves a lot to be desired for the person editing the data.  Each element is named "Element ", which doesn't give any high-level information regarding what data each element contains.  In order to find the element with the data you wish to modify, you'll need to expand each element and look at the properties until you find the one you're looking for.

This shows an Array and  List of the same serializable class.   Each element is named "element ", which doesn't give any high-level information regarding what each element contains.

But wait!  There's an undocumented (as far as I know) trick to drastically improve this!

When you declare a public string as the first variable in a serializable class, the inspector will use the value of that string in lieu of the "Element " tag for each instance data element!


This shows the Arrays and Lists of the same serializable class.  Which do you think it easier to work with?

This makes data management much easier by providing a high-level view of the information each element contains.  Additionally whoever is editing the data can change the value of the string description to suit their tastes.

Expanded view of the List container to show the inner properties of each element. Notice the "String For Description" string is the first element in the class, and the value is used to name each list element.

Hope you find this information useful, leave a comment if you know of any other little Unity tricks, I'm always on the lookout for more!

Wednesday, October 3, 2012

Match'n Flip Released on Google Play™ Store

Yesterday we released our new free game, Match'n Flip for Android™ on the Google Play™ store.  Match'n Flip is a simple, relaxing puzzle game about finding and matching tile patterns.  You can find the app by clicking on the image below.

Android app on Google Play

I'm extremely excited to publicly release Match'n Flip for people to try out.  I've been running a closed beta with some close personal family and friends, but this is the first time people will really be able to see the game in action.

One of the exciting things about this game is how it was originally conceived and came to fruition.  The core concept for Match'n Flip was born out of a 7 day game development project I started and blogged about last month (links below).  After the 7 days project was over I was left with a game that was fun and felt good to interact with, but lacked polish and focus.  Instead of starting a new 7 day project, I decided to spend a few weeks polishing up the game experience, getting friends to play and iterating on the concept and feedback mechanics to really make the game feel solid.

I'd like to thank all the friends and family who helped and supported us, you guys are great!

Day 1 Dev Blog
Day 2 Dev Blog
Day 3 Dev Blog
Day 4 Dev Blog
Day 5 Dev Blog
Day 6 Dev Blog
Day 7 Dev Blog


Wednesday, September 19, 2012

New Project Day 7 of 7 Recap (finally)

NOTE - So I'll admit this 7-day project ended up stretching out much longer than I thought it would in terms of the overall duration. I plan to do a postmortem regarding this project and some of the lessons I've learned to improve the experience when I do it again.

Spent my last day on this project getting my hands dirty with GUI stuff, which ended up swallowing most of my day. I decided to use the NGUI plugin for creating my UI's in Unity for this project, and while it's nice I was scrambling to learn enough to get it functional in my game in any usable form.  I did get a basic score and time display working and added a flare text pop-ups when you gain points, which feels good.

I also spent a bit of time improving the feel of the game by added sounds and animations for user input actions like pressing tiles, dragging times, flipping tiles and detonating tiles.  Below is a small clip to highlight the user feedback.


You can really see the tiles pop-up larger when selected or dragged over while creating a drag connection.  I deliberately made the tiles scale up very large because this will be an iPhone game, and I wanted the tiles to grow large enough so the player can see them under their finger.  I originally used a small scale up, however when I was testing on the phone it didn't read well, so I decided to make it crazy large and felt pretty happy with it.

As for the game mode I talked about earlier, I've decided I probably won't go with that for the final game I release. I kind of liked it, however it felt very un-directed and lacking in substance.  I'm going to spend some time trying out more of a simon-says type mode where you need to create matches based on combinations of shapes the game presents you.  I'll post updates on that as it develops.

I plan to doing a postmortem summary as a different post, however I just wanted to say this "7-day" project was an awesome experience for me and really pulled me out of a funk.  Once I digest some of the lessons from this first experience, I plan on doing another 7-day game in the near future to keep my momentum and creative juices flowing, so stay tuned!

And as a final note, a fellow Raleigh studio BitMonster Games released Lili, their first iOS game today.  I highly recommend you check it out, it's a beautiful game.
Liliā„¢ - BitMonster, Inc.

Wednesday, September 12, 2012

New Project Day 6 of 7 Recap

NOTE - What I talk about for today actually happened last week.  Some life circumstances, visiting family and getting sick on my travels, caused this recap to be delayed until now.

I settled on a game mode I'm going to use for the final game.  It's less ambitious than the mode I originally wanted to expand out, however it's also much easier to understand.  After showing the previous game to some friends, the generally feedback was the rules were too complicated to easily pick up in under a minute.  We all felt the game play was interesting once the rules were understood, but the time it would take to explain that would cause most people to abandon the game early.  I want to revisit this game in the future, but doing so will require gradually building the player's knowledge of the mechanics up over the course of time....ie a longer project.

The new game mode I'm doing is still match-3 based, however I'm doing some twists to try to make it a little more interesting.  The game will be similar to what I showed previously where the player will be able to move tiles around the board, then create connection lines between similar tiles to create detonations.

The twist will be in how the player's actions are scored. Rather than score only based on the tiles being destroyed, I want to score based on the link the player creates between the tiles.  I'm going to start easy at first, so I'll probably make diagonal links between tiles be worth more than up-down, left-right links.  It's not a groundbreaking idea, but it's a start to something different. One thing I've noticed is people think in the up-down, left-right quite a bit; so incentivizing thinking outside those directions will be a good initial challenge for players. 

Wednesday, September 5, 2012

New Project Day 5 of 7 Recap

In case you haven't read some of my previous blog posts about this project, I'm currently working on making a Match 3 type tile game.

I spent a bit of time today working on a new game mode and then showing it off to some friends to get feedback on the mechanics.  For the new game mode I wanted to try something a little more interesting than the usual generic 'score x point in y seconds' or 'play this to infinity' type goals you see with a lot of Match 3 games.  I've taken some inspiration from the iPhone app 10000000 (Called 10 million) which uses Match 3 game play to drive game play in a larger context.  

The new game mode prototype I created is kind of like a boss battle; you fight against a boss that continuously spawns new minor enemies.  You must make frequent small tile # matches to remove the minor enemies that spawn to prevent too many from building up.  In addition you must also create large tile # matches to damage the boss and eventually kill it.  I put up a web player build for anyone who wishes to play it:

NOTE - There is no win/loss condition for this prototype, and everything i describe above is purely represented by the text values displayed on the upper left of the screen. There's no time limit, I'll probably add that at some point so the game doesn't go on forever.  Also this is a very very prototype build I'm sharing for the sake of being open about this project. If things don't work I apologize.

Boss Battle Game Type Prototype


Overall I like the direction of this game type. There's definitely a bit more of a challenge than the normal game play you see in a Match 3, however that may not be a good thing.  Casual players may be turned off by having to manage # of enemies + boss health + time limits + tile management.  That's a lot of concepts to drop onto someone at once, if this were the culmination of some other game modes with introduced these elements slowly, I think this could be very powerful.

I'd love to hear comments!

Tuesday, September 4, 2012

New Project Day 4 of 7 Recap

NOTE - I'm posting this one a day late, I worked very late into the night yesterday and didn't get a chance to do the recap before I hit the sack, sorry about that!

*Warning* Some programmer talk here, skip to the next paragraph if you're not interested*

Today I made a push to start implementing more game modes without gutting the existing game functionality.  The existing general game logic is working very nicely, which you've seen from my previous blog posts.  One thing I'm fighting against is the code isn't well organized given how fast I had to create it.  The majority of the game logic is in one class, however there are some snippets in other areas as well.  I don't want to start modifying that too much in order to implement new game specific logic.  In the past I would have used inheritance to extend the existing game logic class and add the new game specific stuff.  However since the logic is a bit scattered, and that fragmentation will likely get worse as I continue, I decided to try something different: a form of composition.  For each new game mode, I create a custom game logic class that registers delegate callbacks for certain events generated by the core game logic. This lets me modify certain areas of the game, and add entirely new things, without changing the underlying game.

Very simple code org. chart

I showed off a build of the current game to a friend today and got some great feedback from him.  We ended up talking for about an hour about some new ideas and game modes I should try to flesh out tomorrow.  In addition, he whipped up some new art assets for me, little cubes that animate!  Adding these instantly made the game look 100% cooler, hopefully we can get some more stuff in there to really spice things up.

I put up a web build of the game here for those feeling adventurous.  There are no directions on how to play, no scoring and no end goal, this is just to show off the mechanics I have in there right now.  Feel free to leave comments/suggestions if you have any.  Depending on how productive I am, tomorrow I'll try to add a build with one of the new game modes implemented.

UPDATE - I'm told by Bryce, who gave me the blocks, that the blocks aren't rotated correctly. Guess I'll add this to the blooper reel. Tomorrow's update with show a better view of them.


In case you missed it, link to the web build: Build1

Monday, September 3, 2012

New Project Day 3 of 7 Recap

Today was both a productive and unproductive day.  It was very productive on one hand because I got a good bit of stuff done; however it was unproductive because most of what I did ended up not being used. That's the life of prototyping games though, sometimes you only make forward progress by seeing what doesn't work and throwing those ideas into the trash bin so other ideas rise to the surface.

Sometimes this is a little discouraging and other times it's a lot of fun throwing a bunch of ideas out there to see what sticks.  What's more important is sometimes the failed ideas lead you down the path to better ideas you end up using.  Here are a couple pictures, one is trying to do some of my own art for the tiles (horribly failed). Other one is a feature I'll probably end up keeping.

Tried adding an icon to the tiles, decide my art skills aren't up to the challenge

Added the circles to the tile drag line to indicate connections between tiles.  Pretty sure I'll keep this. 

And to cap it off here's a video of one of the game mechanics I tried out.  In case you don't want to hear my silky voice narrate, this video shows off shifting tiles around the board before linking groups of them together (they're linked by color) in order to create an explosion.  It's an interesting idea I may continue looking at, it does feel gratifying to move the tiles around and create a large link and explosion.  I may show it to some friends to see what they think, please leave a comment if you have an opinion too!


Oh and on the project name front, one of my old bosses suggested Drunken Falcon Punch.  I'm not going to say it's a horrible name, but if anyone comes up with some better suggestions I would definitely welcome them :).

Sunday, September 2, 2012

New Project Day 2 of 7 Recap

Unfortunately I didn't get much tangible work done yesterday through a combination of sleeping late and going out with friends.  I felt a little guilty about not making much progress, but then figured I need to have fun like everyone else.  Being a game developer and small biz owner, it's very important to balance work and life so you don't get burned out.  Anywhoo onto game progress....

Spent a bit of time thinking about game and scoring mechanics to use with this game.  I know I'll eventually try out several different ideas, but I want to keep the ideas as constrained as possible so I don't go too far down a path that won't work.  In addition to brainstorming, I created a puzzle board management system that will link with the front-end display system.  I made a system like this previously for Shatter Crash and figured I'd use it for this game; however I'm starting to think I will not use this system for this project.  If this were a longer, more in depth project I probably would, but for such a small and short game, I think it'll just add another layer of abstraction that will get in the way.  Oh well lesson learned...

The one cool thing I did get done was add the ability to randomly colorize the tiles on the board.  I'm pretty sure I'll eventually change this to use unique icons instead of colors, so the game is color blind friendly, but this is a cool step for now.  As an additional cool note, this screen shot is the game running on my iPhone.  It's funny to think of publishing to the iPhone for the first time on this game as a small step.  Just one of the benefits of using Unity.  In fact I could have had the game running on the phone yesterday, but I was actually too busy to take my mac out of my bag and set it up (I started making the game on my PC).


Friday, August 31, 2012

New Project Day 1 of 7 Recap

After deciding to do this week long project yesterday, I jumped right in and started getting my hands dirty.  I'm using Unity3d to develop this game, I've been using it for 3 years or so now so I have a pretty good feel for working with it.  I also decided to make this an iOS/Android project.  If you want to ignore this wall of text, there's a movie at the bottom showing my progress.

I spent a bit of time mulling over what type of game to make.  7 days isn't a lot of time, especially when working more or less alone on this project.  I eventually settled on making a puzzle game that focuses on tapping and swiping.  Tapping and swiping are fun gestures to use on your phone, so I figured that would be a good basis to start from.

I started out making a system to lay out a grid of tiles to represent the puzzle pieces.  Once I had a grid layout working, I began working on some basic input so I could tap to select a tile and then tap another tile to force them to flip position.  To add some life to the tile movement, I used Prime31's GoKit Tween Library to animate the translation and scaling of the tiles so they felt more interesting.

Next I started working on the drag selection and line drawing system.  This turned out to be fairly involved to get working, especially the line-drawing part.  I initially tried using Unity's built in line rendering system, but that exhibited some annoying deformation when the line changed direction, resulting in an non-uniform line...ewww


Luckily I came across a blog with some solutions to this particular problem.  I ended up implementing a custom line rendering system using the Unity'd Graphics API, which worked wonderfully.  You can see the results in the movie below.

That's it for the 1st day recap.  Today I'll be working on adding the ability to unselect a tile when dragging, adding some constraints to the drag system, and beginning to create a backend system to track each spot on the board.


Thursday, August 30, 2012

New Short Project Intro...I Guess

Today I decided to make a new game and ideally finish most of the heavy work on it within a week.  To help keep myself honest and on track, I also figured I may as well blog about the experience.  I'm not 100% sure what the game will be, however I'm leaning pretty strongly to doing a simple 2d tile-base puzzle game.  Mechanics for that are relatively simple to create, and there are a lot of cool game variations possible.

Why am I doing this?
My last project Shatter Crash took a little over a year to complete from start to finish.  I still enjoy playing the game and tinkering with it; however working on one project for that long, and as 1 part of a 2 man team, got exhausting.  Doing something short and focused on a tight set of core mechanics will be a breath of fresh air.

What are my goals?
Mainly to have fun and help get myself re-grounded and re-focused.  Finishing off Shatter Crash took a lot of energy and became a grind at the end.  I also want to focus on making something deliberately small in scope and laser focused on a core set of small features.  I tend to feature creep quite a bit, so this is also practice on keeping things small.

Obviously I don't have much to talk about right now as I'm just starting to get things ramped up.  I plan to do at least 1 entry a day to talk about and show off my progress.