I was going through my blog looking at old drafts and stumbled upon a draft with my thoughts about the iPad shortly after it was announced in 2010. The creation date for this post was 2/10/2010. It was interesting comparing my previous thoughts about the iPad, and tablets in general, with the reality of their existence now. I do feel kinda proud about the book market prediction, especially given Apple's press event earlier this week where textbook on the iPad got a lot of love.
Other than this intro section, the entry below is unmodified from my Feb. 2010 blog draft (even left some annoying spelling errors in there).
-------------------------------- Look back in time ---------------------------
I'm about 2 weeks late writing this, but figured it's a good time to put my thoughts out there regarding the iPad.
I have to admit I hopped Apple wouldn't announce a tablet, since I honestly don't see the market role it will fill. I assume I'm in the demographic Apple is trying to reach with the iPad, given I'm a relatively young, tech-savvy person with disposable income. The problem is I just don't see any reason why I'd need one, given I already have an iPhone and a couple computers. Talking with some of my co-workers, the couple areas we could see it being popular is with people traveling a lot, or people who want it because it's an Apple product.
From Jobs's presentation, I get the feeling they're definitely going to push the e-book market and try to take market share from the Kindle and Nook. I'll be interested if they can gain access to a comparable amount of book content to compete against those two systems.
Thursday, October 25, 2012
7 day project postmortem
I promised to write up a summary about my 7 day game project last month, and managed to procrastinate on it for this long. However I'm planning to do another 7 day game project here very soon, so I figured I should probably tie up the loose ends on the last one before moving forward.
For anyone here for the first time, in September (2012) I challenged myself to create a game in 7 days. I blogged about each day of the process, and in the end I had a game I eventually released for Android on the Google Play Store as Match'n Flip. A big reason I decided to do this 7 day game challenge was to help kick start my creative juices and get back into the rapid game prototyping mindset. As a postmortem for that experience, I'll share a few pearls of wisdom for anyone considering doing a similar mental exercise.
Thanks for reading! I plan to do another 7 day game challenge for myself in the next week or so. Once again I'll be writing out it everyday, so check back soon!
For anyone here for the first time, in September (2012) I challenged myself to create a game in 7 days. I blogged about each day of the process, and in the end I had a game I eventually released for Android on the Google Play Store as Match'n Flip. A big reason I decided to do this 7 day game challenge was to help kick start my creative juices and get back into the rapid game prototyping mindset. As a postmortem for that experience, I'll share a few pearls of wisdom for anyone considering doing a similar mental exercise.
What Went Right
- Keeping eyes on the prize - 7 days isn't a whole lot of time to get a game kicked out; so it's very important to stay focused on what's important to the game play. I'm frequently guilty of adding complexity to a game to try to add fun, and while this can sometimes work, many times extra complexity isn't needed. One of my goals for this project was to create a game around a simple game mechanic, and let the game mechanic stand on its own. This mindset worked very well for me and help me focus on the core game mechanic and resist the temptation to add unnecessary extra features.
- Rapid prototyping and iteration - One of my goals for the project was making better use of my time during development and implementing functionality with more friendly tweaking ability. Unity3D is super convenient because any publicly declared variables will automatically show up in the editor and are available to tweak/change at run time In the past I haven't used this as much as I should have, preferring instead to hard code variable values and changing them in code on the fly. While it's debatable as a more 'programmer friendly' approach, it artificially adds extra time for testing small value tweaks for no real reason because you need to wait for the editor to recompile the scripts. It seems stupid now, but fighting one of the best features of the engine you're using is not a good idea; and embracing it will help you get things done much faster.
- Sought input from friends - I made it a point to get as much input as possible from friends and family as the game progressed. This let me get fairly unbiased impressions of the game and specific features before I'd invested too much time in them; and then make appropriate course corrections and changes. In one of the best examples of this, I told a friend about an idea I had for some game rules I wanted to try out. After explaining them he looked at me and said, 'Jay that's confusing as hell, no one will understand that in 15 seconds'. Talking to friends, asking their opinion about the game you have so far, or ideas you want to try, is super helpful.
What Went Wrong
- Started 7 day challenge at a bad time - I started the 7 day challenge almost as soon as I thought of the idea because I was excited to get momentum for myself to start working. Unfortunately I didn't think to look at my schedule ahead of time; so the last 2 days happened when I was on vacation to visit my family. Because of this and the next point I'll talk about, my 7 day challenge ended up spanning almost 2 weeks.
- Got sick for the last 2 days (while on vacation) - While I was visiting my family I also got sick, which meant any time I could have eke'ed out to work was lost because I was in bed sleeping. It's amazing how much energy it can take to be creative; while I lay in bed resting I would try to think of game ideas for the challenge. However usually I was too exhausted to think of anything and would usually fall right asleep thereafter. Just bad luck there.
- Had to learn a new GUI system - For this project I decided to switch to a new GUI system (NGUI) for Unity3D (the game engine I primarily use for my games). While I'm glad I switched to NGUI there was definitely a learning curve to overcome, which ended up chipping away at the time I could have used to work on the game. Next time I'll get ramped up on any new tools beforehand, so there will be less impact on the actual game dev time.
Summary:
Overall this was a very fun and exciting experience for me. After completion our previous project, Access Point, I was feeling very burnt out and mentally exhausted. Giving myself a 7 day challenge was a breath of fresh air, and a great way to get myself back into the mindset of making new games.Thanks for reading! I plan to do another 7 day game challenge for myself in the next week or so. Once again I'll be writing out it everyday, so check back soon!
Wednesday, October 10, 2012
Trick for visualizing arrays of serializable classes in the Unity3d inspector
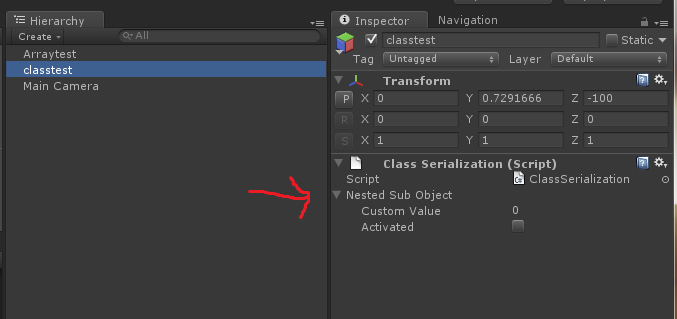
In the Unity3D editor,the inspector will automatically show the names and values of any variables you declare within a MonoBehaviour -derived component. This is incredibly useful for debugging the values of properties while testing, and also provides a very easy avenue to tweaking the values of exposed variables.
However what do you do if you want to nest a class of related properties in a MonoBehaviour -derived component? By default the names and values of the variables within the nested object will appear in the inspector. This is where the System.Serializable attribute is necessary, applying the System.Serializable attribute to the class will tell the Unity inspector to display the names and values of the variables in the inspector. This makes the System.Serializable attribute a very handy tool!

One common using for serializable nested subclasses is in lists/arrays to hold configuration data for any number of things, such as inventory descriptions and properties, level lists, difficulty modifiers, etc. Unfortunately when you put a serializable class in a List or Array, the way each instance element is named leaves a lot to be desired for the person editing the data. Each element is named "Element", which doesn't give any high-level information regarding what data each element contains. In order to find the element with the data you wish to modify, you'll need to expand each element and look at the properties until you find the one you're looking for.
But wait! There's an undocumented (as far as I know) trick to drastically improve this!
When you declare a public string as the first variable in a serializable class, the inspector will use the value of that string in lieu of the "Element" tag for each instance data element!
Hope you find this information useful, leave a comment if you know of any other little Unity tricks, I'm always on the lookout for more!
However what do you do if you want to nest a class of related properties in a MonoBehaviour -derived component? By default the names and values of the variables within the nested object will appear in the inspector. This is where the System.Serializable attribute is necessary, applying the System.Serializable attribute to the class will tell the Unity inspector to display the names and values of the variables in the inspector. This makes the System.Serializable attribute a very handy tool!
One common using for serializable nested subclasses is in lists/arrays to hold configuration data for any number of things, such as inventory descriptions and properties, level lists, difficulty modifiers, etc. Unfortunately when you put a serializable class in a List or Array, the way each instance element is named leaves a lot to be desired for the person editing the data. Each element is named "Element
 |
| This shows an Array and List of the same serializable class. Each element is named "element |
But wait! There's an undocumented (as far as I know) trick to drastically improve this!
When you declare a public string as the first variable in a serializable class, the inspector will use the value of that string in lieu of the "Element
 |
| This shows the Arrays and Lists of the same serializable class. Which do you think it easier to work with? |
This makes data management much easier by providing a high-level view of the information each element contains. Additionally whoever is editing the data can change the value of the string description to suit their tastes.
 |
| Expanded view of the List container to show the inner properties of each element. Notice the "String For Description" string is the first element in the class, and the value is used to name each list element. |
Friday, October 5, 2012
Making use of C# extension methods in Unity3d
I recently started using C# extension methods in Unity3d and found them very helpful for my workflow, so I decided to share. During development of my recently released game Match'n Flip my goal was to rapidly prototype new game play modes quickly, so being interrupted by small things was very disruptive. So far I've only done very simple helper methods, but these handle things which previously broke my workflow because of small nuances.
One particularly useful extension set I created are methods to move a game object along one axis, such as move a game object along the global x axis by 5 units. Conceptually this is a very simple operation:
transform.position.x += 5F;
is essentially all you need to do, however because Unity doesn't allow you to change just 1 element of the position Vector3, instead you need to do this:
Vector3 temp = transform.position;
temp.x += 5F;
transform.position = temp;
Conceptually not difficult, but writing those 3 lines can easily break your train of thought as you're working and slow down your creative process. Additionally these little snippets are annoying because you actually have to look at them a moment to see what the transform operation is, since the meat of the operation is done on a new object not related to the object you want to modify (temp Vector3 local variable vs the position vector3 transform property).
To reduce these brain train killer situations, I created a set of ShiftPosition transform extensions methods to handle the annoying part of these operations. Using these I can do the same operation as above one neat line and in a way that's intuitive to see what's going on:
transform.ShiftPositionX(5F);
Under the hood the ShiftPositionX/Y/Z extensions are still modifying a temp Vector3 which is re-assigned back to the transform.position property.
Here's a small snippet of what the TransformExtensions class looks like, sorry for formatting getting hosed. Feel free to use this in your own projects if you wish, or if this is interesting to anyone, please contact me and I'll expand on this with more helpers/details!
public static class TransformExtensions
{
#region ShiftPosition
public static void ShiftPositionX ( this Transform tran, float offsetX )
{
Vector3 temp = tran.position;
temp.x += offsetX;
tran.position = temp;
}
public static void ShiftPositionY ( this Transform tran, float offsetY )
{
Vector3 temp = tran.position;
temp.y += offsetY;
tran.position = temp;
}
public static void ShiftPositionZ ( this Transform tran, float offsetZ )
{
Vector3 temp = tran.position;
temp.z += offsetZ;
tran.position = temp;
}
#endregion ShiftPosition
}
Hope you find these useful!
Wednesday, October 3, 2012
Match'n Flip Released on Google Play™ Store
Yesterday we released our new free game, Match'n Flip for Android™ on the Google Play™ store. Match'n Flip is a simple, relaxing puzzle game about finding and matching tile patterns. You can find the app by clicking on the image below.

I'm extremely excited to publicly release Match'n Flip for people to try out. I've been running a closed beta with some close personal family and friends, but this is the first time people will really be able to see the game in action.
One of the exciting things about this game is how it was originally conceived and came to fruition. The core concept for Match'n Flip was born out of a 7 day game development project I started and blogged about last month (links below). After the 7 days project was over I was left with a game that was fun and felt good to interact with, but lacked polish and focus. Instead of starting a new 7 day project, I decided to spend a few weeks polishing up the game experience, getting friends to play and iterating on the concept and feedback mechanics to really make the game feel solid.
I'd like to thank all the friends and family who helped and supported us, you guys are great!
Day 1 Dev Blog
Day 2 Dev Blog
Day 3 Dev Blog
Day 4 Dev Blog
Day 5 Dev Blog
Day 6 Dev Blog
Day 7 Dev Blog
Subscribe to:
Posts (Atom)